How to Disable Laptop Touch Screen Windows 10
Laptops with touch screen capabilities such as Microsoft Surface and other devices are pretty common these days. However, not everybody finds the touch feature necessary or useful for their day-to-day tasks.
On a Windows device, the touch screen function is usually enabled out of the box so that you can use your finger to navigate the laptop's operating system.

If the screen is cracked, you find the feature too distracting, or you just don't use the touch-enabled display on your laptop, you can easily turn it off and continue with your work.
In this guide, we'll show you how to disable the touch screen in Windows 10.
How to Turn Off the Touch Screen (Windows 10)
While the touch screen function is quite useful for users with tablets like the Surface Pro, it may not always work as advertised. On certain occasions, you may want to turn it off to boost your laptop's battery life when you're on the go or troubleshoot something.
Whatever your reason, you can disable the touch screen with a few steps using Device Manager, Command Prompt, Windows PowerShell in Windows 10 or by editing the Windows registry.

Use Device Manager to Turn Off the Touch Screen (Windows 10)
Windows Device Manager is a centralized utility in Windows 10 that offers an organized view of all the hardware installed in your PC. As an extension of the Microsoft Management Console, Device Manager manages devices like sound cards, hard disk drives, USB devices, keyboards and more.
You can use Device Manager to manage, update and roll back drivers, change hardware configuration options, identify hardware device conflicts, and enable or disable hardware.
Device Manager isn't listed among your regular programs, but you can access it in different ways so as to disable your laptop's touch screen.
- To get started, right-click Start and select Device Manager or type Device Manager in the search box and select it from the search results.
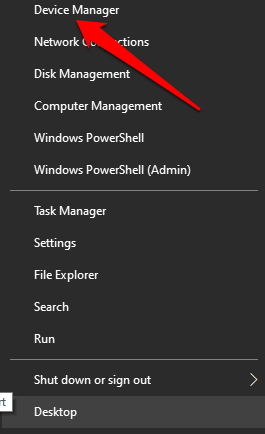
Note: Depending on your version of Windows, you can open Device Manager using the Control Panel. To do this, select the Control Panel from the apps screen or Start menu and then select Hardware and Sound.
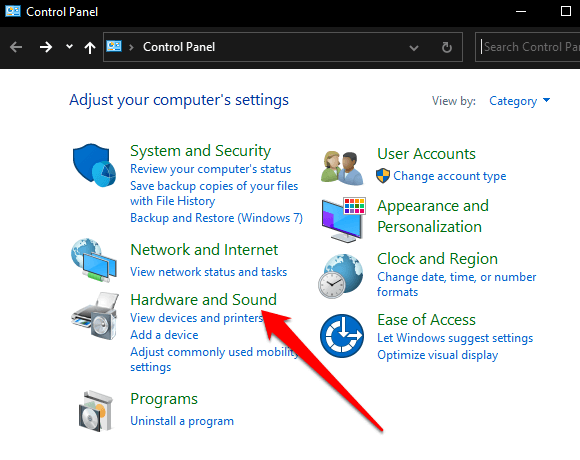
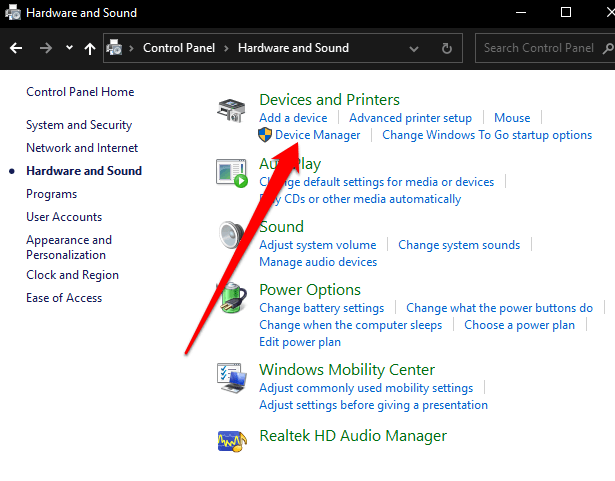
Under Devices and Printers, select Device Manager to open it.
- Select the Human Interface Devices section to expand it.
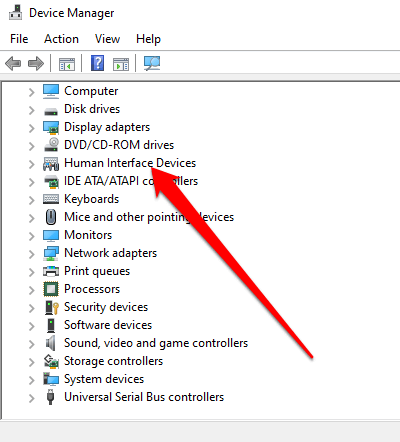
- Next, select the HID-compliant touchscreen.
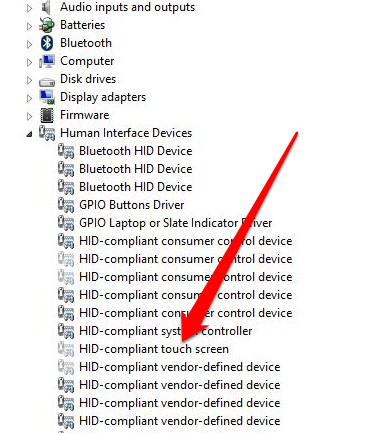
- Select Action tab and then select Disable device. A popup will appear notifying you that disabling the touch screen will hinder it from working. Confirm the action to disable the touch screen.
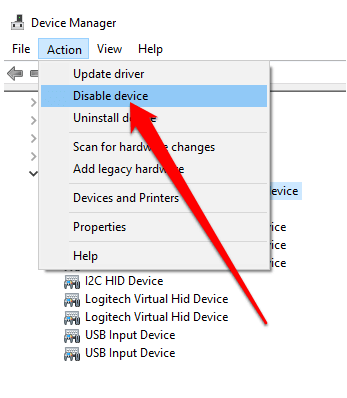
The touch screen is now disabled and you can tap on the display to test it out.
To re-enable touch screen, go back to the Device Manager and right-click on the HID-compliant touch screen option. Select the Enable device option and confirm your choice.
Note: In the event that touch screen isn't working after enabling it, restart your laptop and see if it works again.
How to Disable the Touch Screen Using Command Prompt
You can also disable the touch screen in Windows 10 using Command Prompt.
Command Prompt, sometimes referred to as CMD prompt, cmd.exe or command shell is a command line interpreter in Windows 10 that executes any commands you key into it. The commands use scripts and batch files to automate tasks, troubleshoot or solve certain Windows issues, and perform advanced administrative tasks.
If your mouse isn't working or your laptop isn't working properly, you can use Command Prompt to disable the touch screen in a Windows 10 PC.
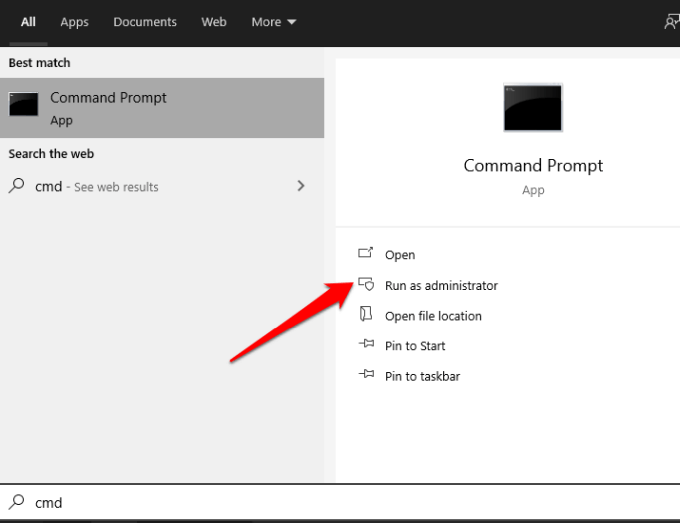
- To do this, enter CMD in the search box and select Run as administrator in the Command Prompt search results.
- Enter the command: devmgmt.msc and press Enter.
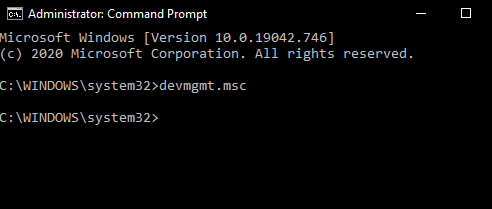
The Device Manager screen will open, and you can disable the touch screen using the same steps in the Device Manager method.
Use Windows PowerShell to Disable the Touch Screen
Windows PowerShell is a cross-platform command-line shell and scripting language introduced in Windows 8, which offers a simple way to automate tasks and access system and management tools.
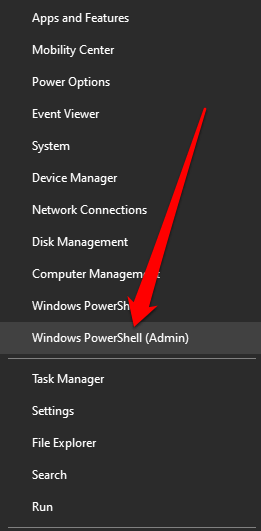
- To turn off the touch screen using Windows PowerShell, right-click Start and select Windows PowerShell (Admin). Alternatively, you can use the WIN+X keyboard shortcut to quickly open PowerShell if your mouse isn't working.
- Next, enter the command: Get-PnpDevice | Where-Object {$_.FriendlyName -like '*touch screen*'} | Disable-PnpDevice -Confirm:$false
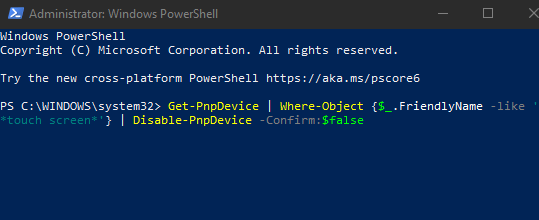
The touch screen will be disabled and you can test it out to confirm.
Turn Off the Touch Screen Using Windows Registry
Another way to turn off the touchscreen on your PC is via the Windows Registry using these steps.
A Word of Caution About Editing the Windows Registry: If you've never edited the Windows Registry before, find an expert to do it for you because one wrong entry can render your computer unusable or unbootable. If you're comfortable with this method, backup the registry first and then follow these steps:
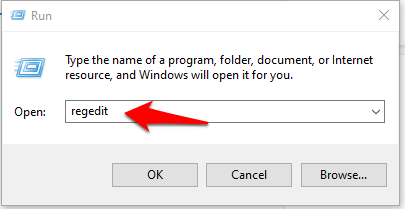
- Select Start > Run and enter regedit in the Run dialog box.
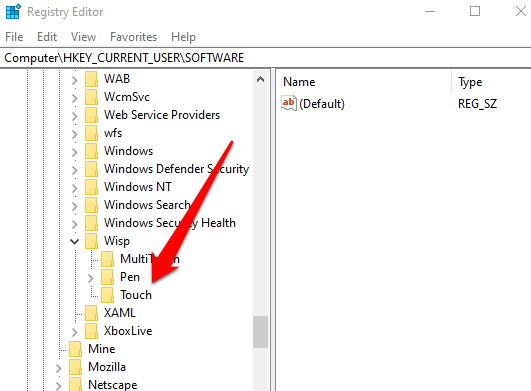
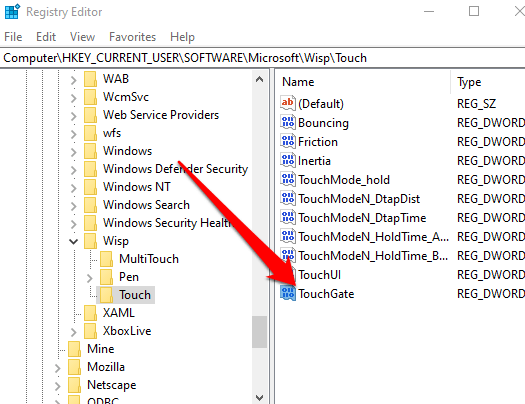
- Go to the registry key: Computer\HKEY_CURRENT_USER\Software\Microsoft\Wisp\Touch
Image: 14-how-to-disable-touch-screen-in-windows-10-registry-key
- Right-click to create a new DWORD 32-bit entry in the right-hand pane and label it TouchGate.
- Double-click on the new DWORD you've created and then change the entry value to 0 and then restart your PC.
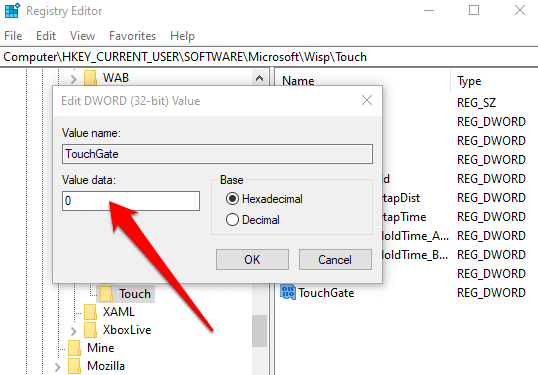
To enable touch screen, go back to the registry key, and change the TouchGate value to 1, or delete the TouchGate entry altogether.
Turn Touch Off in a Few Quick Steps
We hope this guide helped you disable the touch screen on your Windows 10 device. Check out other Windows 10 unnecessary services you can disable safely, and our guides on how to turn off indexing to save CPU and RAM resources or how to disable Cortana to protect your privacy and personal data.
Do not share my Personal Information.
How to Disable Laptop Touch Screen Windows 10
Source: https://helpdeskgeek.com/windows-10/how-to-disable-touch-screen-in-windows-10/